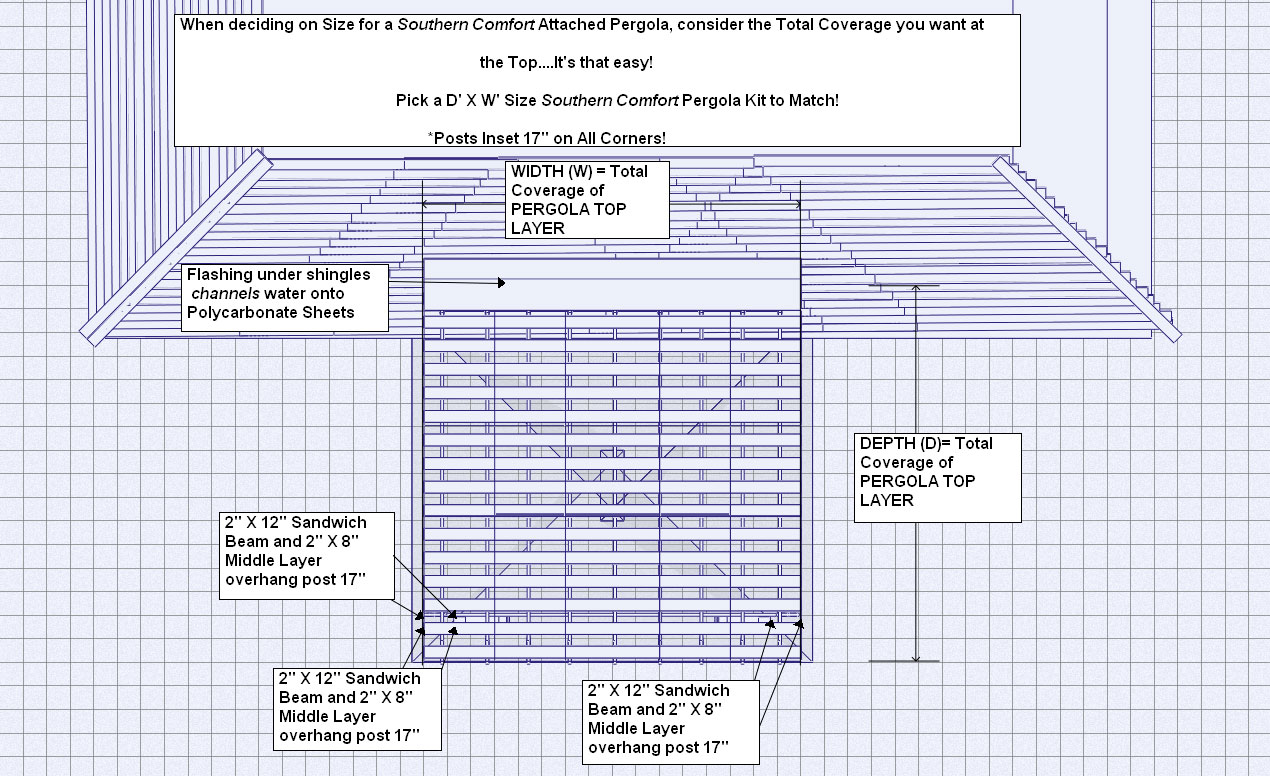
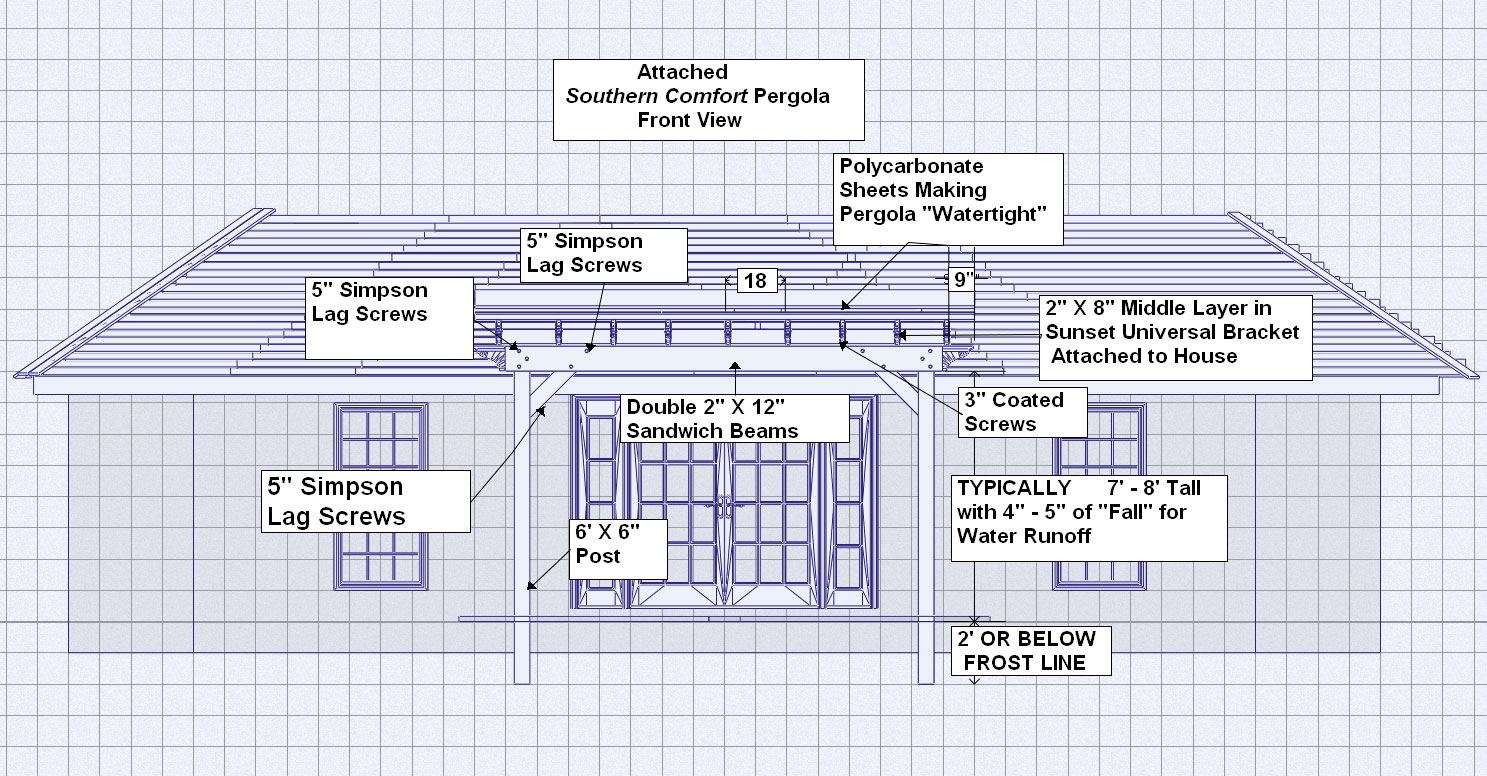
Attached Pergola Specs

Pergola Specs for our Attached Kit

Click here to download Attached Sunset Pergola Kits Instructions

Instructions for Attached Pergola with Sunset Universal Pergola Attachment System

1) Organize all Pergola Components and Ensure you have all Pieces, Material List, and Pergola Layout.

2) Layout for Posts D X W (Posts are Inset 18” on ALL SIDES)
-Dig holes for posts set in Concrete, or Install concrete anchors for posts set on concrete.

3) Attach the Sunset Pergola Universal Bracket Ledger onto Roof, Wall, Fascia, or Under Soffit using 5” Self-Starting Lag Screws. *Use a stud finder to find wall studs and framing, fascia rafter tails and roof rafters. Decide on Attachment Height for Sunset Universal Pergola Attachment Ledger on House. *All Pergolas Have A 2” X 8” Middle Rafter. *Install Sunset Universal Pergola Attachment Ledger with the Middle Bracket Aligned Where You Want The Center Of The Pergola. Example: If your have 17 Rafters, Center the 9th Rafter Bracket.

4) Cut 8” X 8” “Absolute Posts” toHeight. *Measure from Bottom of Bracket Ledger on House to the Ground (Allow 3-4 inches of “Fall” away from house for Water Run Off, if installing a Watertight Pergola.)

5) Stand (2) 8” X 8” “Absolute Posts” into their Post Bases, or On Deck, or In the Holes Dug In the Ground. Make sure Posts are Level and Square. Add Concrete (if applicable)

6) Attach(1) 2” X 12” (Bottom Layer) across each post at the top, ensuring all is Square.
*Secure Each 2” X 12” with (4) Self-Starting 5” Lag Screws with a Drill and “Star” Bit (PROVIDED.) *No need to Pre-Drill. All 5” Lags Screws are Self-Starting!

7) Install 8” X 8” Angle Braces on Each Post (if included) using 5” Self-Starting Lag Screws. (3) through the 2” X 12” and (1) into 8” X 8” “Absolute Post” at an angle.

8) Once centered, continue placing 5” Self-Starting Lag Screws through the Sunset Pergola Universal Bracket Ledger making sure to hit studs and/ or rafters every 16” or so. Place 5” Self-Starting Lag Screws through the un-used holes in the Universal Brackets.

9) Add Concrete around 8” X 8” “Absolute Post” at this time and ensure everything is level.

10) Secure second 2” X 12” (Bottom Layer) with 5” Self-Starting Lag Screws. (4) in each 8” X 8” and (2) in all Angle Bracing.

11) Hang all Pre-Notched 2” X 8” (Middle Layer.) *Find and hang #1 and the Last 2” X 8”. The First and Last and Middle 2” X 8” have pre-marked “X”s on top for spacing the 2” X 6” Top Layer. All 2” X 8” secure with a Black 1⁄2” Bolt and Nut on Sunset Pergola Universal Bracket and get “toe-nailed” with 3” screws (PROVIDED) as they cover the “X” on top of each 2” X 12” Sandwich Beam.

12) Install the 2” X 6” (Top Layer.) To ensure proper spacing, place each 2” X 6” over the “X” seen on the tops of the First and Last 2” X 8”. Secure each 2” X 6” with (2) 3” Screws.

Enjoy Your Pergola!

*If Making Pergola Watertight, Continue...

13) Install EZ GLAZE Polycarbonate Sheets Making Pergola Watertight. Sheets should go up perfectly square. *Sheets are secured with 2” Screws through the Ribs Only Every 24”. *Add Additional Screws on Sheet Ends and Sides of First and Last Sheet.

14) Install 20” Flashing Under Existing Shingles or Siding Where Needed (PROVIDED.)

Flashing to be tucked under one shingle and to be SCREWED DOWN THRU EZ GLAZE Polycarbonate Sheets INTO 2” X 6” TOP LAYER. 5’ Sheets of Flashing are installed with 1’ of Overlap (As Shown) for pergolas tucked in a corner requiring flashing on 2 or 3 sides.
Enjoy your Watertight Pergola from Sunset Pergola Kits!

Enjoy your Watertight Pergola from Sunset Pergola Kits!

Click here to download Attached Sunset Pergola Kits Instructions